Category Archives: Windows

Allow or disallow Flash for certain websites in Firefox

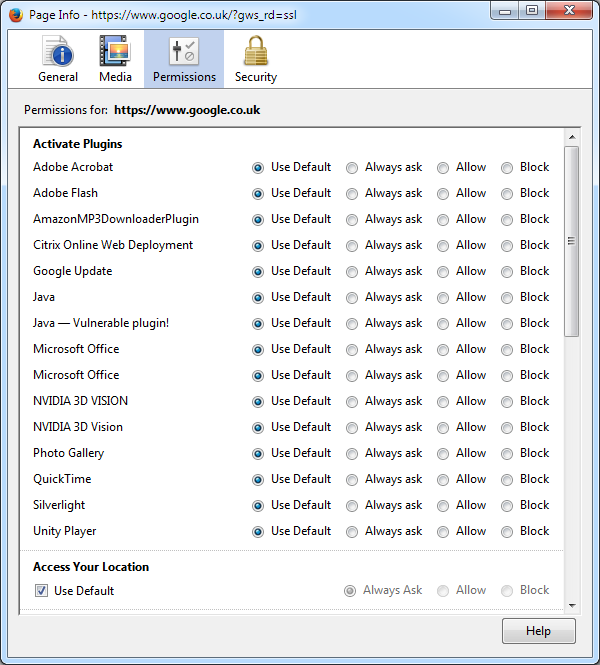
In order to allow or disallow third party plugins for certain websites in Firefox you need to perform the following steps:

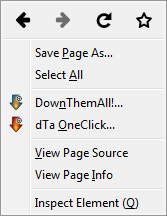
  1. Go to the desired website and right-click on the window, this should display the following promptFirefox - View Page Info
  2. Select ‘View Page Info’ then click the Permissions tab, this will display the window below, here you can toggle a plugin for each website, for instance disable Flash browser wide but enable it to be used in Spotify.Firefox - Page Permissions

CD or DVD drive not found in Windows 7

If your CD\DVD drive is identifed by your BIOS but not by Windows 7 then try the following:

  • Run regedit.exe
  • Browse to HKEY_LOCAL_MACHINE\SYSTEM\CurrentControlSet\ControlClass
  • Delete both UpperFilters and LowerFilters in the right-hand pane
  • NB: Leave both the UpperFilters.bak and LowerFilters.bak entries

If this doesn’t work then try resetting the drive letter using the following:

  • Run the Disk Management tool
  • Choose ‘Create and format hard disk partitions’
  • If the DVD drive is present then right click it and select ‘Change Drive Letter and Paths’
  • Click ‘Change’ and select a new letter
  • If the CDDVD drive is now visible in Explorer you can change the letter back
  • If it is still not visible then reboot and it should appear

Perform a clean install with Windows 7 Upgrade

Paul Thurott and friend have worked out how to do a clean Windows 7 installation whilst only using the Windows 7 upgrade disc.

The instructions are as follows:

  • Perform a clean installation using the Upgrade disc.
  • Install all pending Windows Updates.
  • Open regedit.exe from the Start Menu.
  • Navigate to HKEY_LOCAL_MACHINE/Software/Microsoft/Windows/CurrentVersion/Setup/OOBE/
  • Change MediaBootInstall from ‘1’ to ‘0’.
  • Open the Start Menu again and type ‘cmd’ — use ctrl+shift+enter to run it as an elevated-permissions user.
  • Finally, type slmgr /rearm — and press enter.

You can now reboot and activate Windows 7 by running the Activate Windows utility, type in your product key and it should now work.

Hanging at 62% when you upgrade from Windows Vista to Windows 7

If when attempting to upgrade from Windows Vista to Windows 7 your installation hangs at 62% this could be due to the iphlpsvc service and Microsoft offers the following fix:

  1. Reboot the computer; this will cause a rollback to Windows Vista.
  2. Click Start, and right-click Computer.
  3. Click Properties, and then click Advanced System Settings.
  4. Click Environment Variables.
  5. Under System Variables, click New, and then press ENTER
  6. Type in the following variable information:
    Variable Name: MIG_UPGRADE_IGNORE_PLUGINS 
    Variable value: IphlpsvcMigPlugin.dll
  7. Then Restart Setup.

Note This workaround only applies to the iphlpsvc service hangs

Microsoft Support article

Map a network drive in Windows 7

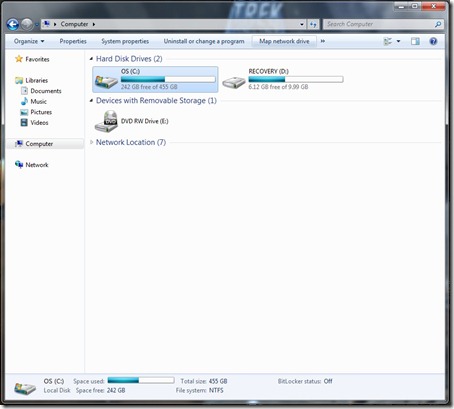
Mapping a network drive in Windows 7 is similar to Windows Vista, firstly you need to navigate to the Computer window in Windows Explorer, this should display a list of your hard disks and removable drives in a similar style than below. You then need to click on the ‘Map network drive’ button to start the wizard.

Map network drive button in Windows 7

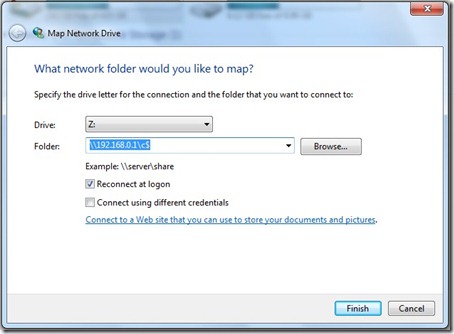
Here you then select the drive you want it to appear as and the folder to share it as, you can also configure options regarding reconnecting to the drive at logon and/or to connect using different network credentials. Completing the wizard will add the drive in your Computer window in Windows Explorer.

Map network drive wizard in Windows 7

Make older programs run in Windows 7

Windows 7 has many built in backwards compatibility features but a new one is the Program Compatibility troubleshooter. To run the troubleshooter follow the following steps:

  • Open the Program Compatibility troubleshooter by clicking the Start button Picture of the Start buttonand then clicking Control Panel. In the search box, type troubleshooter, and then click Troubleshooting. Under Programs, click Run programs made for previous versions of Windows.

  • Follow the instructions in the troubleshooter.

If you cannot install a program, insert the installation disc for the program and, using the troubleshooter, browse to the program’s setup file, usually called Setup.exe, Install.exe, or something similar. The troubleshooter is not designed to work on programs that have an .msi file name extension.

You can also open the Program Compatibility troubleshooter by right-clicking a program’s icon or shortcut and then clicking Troubleshoot compatibility.
Restore the Quick Launch toolbar in Windows 7

One of the first things I noticed when I installed Windows 7 was the missing Quick Launch toolbar, this is mainly because the functionality has now been integrated into the main taskbar but if you desperately need it back you can follow the steps below:

    • Right-click the taskbar and select Toolbars > New Toolbar
    • In the folder selection dialog, enter the following string and click Select Folder:
      %userprofile%\AppData\Roaming\Microsoft\Internet Explorer\Quick Launch

The quick launch toolbar has now been setup, to make it look like the old version you can remove the title and text associated with the icons by first unlocking the taskbar and then right-clicking the quick launch toolbar and deselecting ‘Show text’ and ‘Show title’. Whilst the taskbar is unlocked you can also rearrange to put it in your preferred place on the taskbar.

How to disable real-time protection in Microsoft Security Essentials

Microsoft has just released their new free anti-virus product called Microsoft Security Essentials, it has been in public beta for a while now but just been released to the masses, I’ve only just installed it on the whole it seems as good as an anti-virus program from the makers of your operating system would be. One feature that I couldn’t easily find was how to disable the real-time protection on the fly which would be handy for when I want to play games without any interference from the real-time scanning. Currently the only way to do this is listed below:

  1. Open the main program window by either double clicking on the taskbar icon or running the Microsoft Security Essentials shortcut on your desktop.

    Microsoft Security Essentials - Home

  2. Click on the Settings tab and then click Real-time protection in the box on the left, to disable the real-time protection untick the tick box in the panel on the right and then click the Save changes button. It has now been disabled.

    Microsoft Security Essentials - Settings

  3. Just in case you weren’t sure this was a bad thing the Home tab has now been changed to warn you that you are at risk, to turn real-time protection back on it is as simple as clicking the giant red Turn on button once you are ready.

    Microsoft Security Essentials - At Risk

Arrange windows side-by-side in Windows 7

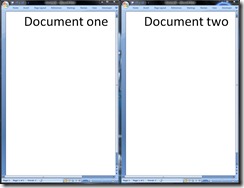
Thanks to a new feature in Windows 7 you can now arrange two windows side-by-side which can be helpful when comparing documents or moving files from one folder to another.

windows_7_snap

  1. Drag the title bar of a window to the left or right side of the screen until an outline of the window appears.
  2. Release the mouse to move the window to that side of the screen.
  3. Repeat the steps 1 and 2 for the other window but with the opposite side of the screen.